This is an update to my last post using the newly launched Pi 2 W, where I previously tried to setup a Pi Zero W as a desktop  computer with a custom desktop environemnt based on Raspberry Pi OS Lite and IceWM. Pi Zero as desktop


With the launch of the new Raspberry Pi Zero W 2, the processing power of the tiny Raspberry Pi 2 W has been upped from a single core to a quad core CPU. The form factor of the original board has been retained. The 512MB RAM unfortunately still remains the same as before. This has given it a big boost in terms of flexability and options which might not have worked as well before. This has made it even more viable as a backup machine for basic computing, provided memory can be managed very carefully. 


The biggest limiting factor in the above setup was the browser. Whilst Dillo is very fast, not having support for JavaScript meant that it was limited in what you could do. Whilst Midori was installed, it was extreamly slow and only there as a last resort. After recreating this setup on the new Pi Zero W 2, Midori is now more usable, albeit still pretty slow. Looking for an alternative somewhere between Dillo and Midori/Chromium, I've compiled the old and now unsupported Netsurf browser on the Pi. It is impressively fast and it feels virtually as fast as a "normal" desktop machine. However, it doesn't quite support all the current standards as I've found formatting issues on certain websites and it doesn't support logging into Google accounts (It seems to have something to do with an older JavaScript version supported), and thus no Google services such as Gmail work. 


Continuing with testing super lightweight browsers, I installed Uzbl browser and found it very good as well (with caveats). It's also an older unsupported browser (last being updated around 2017). Performance is very good on the Pi Zero, and the rendering of general websites is OK. It fortunately supports Google account login which means that Gmail is accessable (HTML only format). The one caveat to this browser is that it doens't have any URL bar or tabs as other browsers do - It's controlled by hotkeys. At first it doesn't seem to be intuitive, but after understanding how it works, and remembering 2/3 keys, it's not bad at all. The speed of use definitely makes up for the unusal interface. 


I've also installed gnome-maps as a potentially faster alternative to Google maps in Midori. Whilst Google maps is usable in Midori, it's not fast. Having both options alows you to use the faster Gnome-maps when street view isn't important, but there's still the possibility of using Google Maps via browser.


If the performance of the Uzbl browser could be combined with the more conventional UI of Netsurf and supported more current standards, this would be an almost perfect browser for the PI. Now that I've learnt how to use the Uzbl browser, there might not be a need for netsurf, but I'll retain both for options/testing.


With some carefull app selection and a few workarounds here and there, the new Pi zero is very close to being a usable machine for basic computing. As a testament to the impressive ability of this tiny computer, this post has been entirely written on the Pi Zero W 2 whilst listening to music from YouTube and posted via Midori. To me, it's crazy to think that a board like this which was really intended for robotics/embedded electronics projects can be used for general computing as well. 

Looking at my Raspberry Pi Zero and maybe being partially inspired by the now defunct "One Laptop Per Child" project from a few years ago, which aimed at building a laptop for under $100, I wondered if a usable computer could be created out of the Raspberry Pi Zero. Or maybe it's just the challenge of seeing how far this tiny computer can be pushed that had me wondering whether this was even possible. Is there much point to this? Probably not. However, even though this may not be that practical, the Pi Zero, could be replaced with the slightly more expensive Pi 4 2GB, which would make for a pretty efficient and usable desktop PC.   

Raspberry Pi Zero Desktop setup
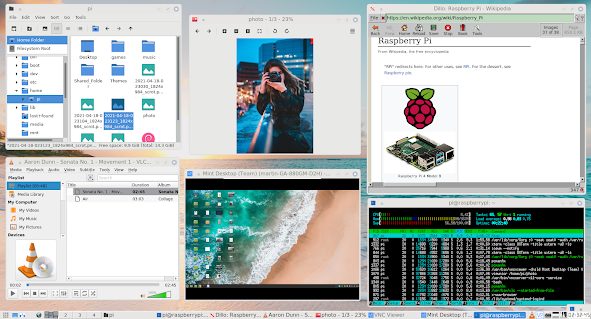
A complete set of desktop apps including file browser, media player, browser and remote desktop running in 130MB RAM.


What is a Raspberry Pi Zero..? It's a single board computer built by the Raspberry Pi Foundation which can easily fit in the palm of your hand being just 65mm x 30mm. There are basically two different Pi Zero models, which are differentiated by having WIFI and Bluetooth or not. (There's also the more recently launched Raspberry Pi Zero 2 W, which has 4 cores, but the same 512 MB RAM and the form factor.) Costing just over $10 for the WIFI + Bluetooth model, they are very affordable and might just make for a very cheap base to build a computer. Another interesting point is that they are so energy efficient that they can be powered from a battery pack for hours or even from solar panels. That being said however, it was not designed to be a desktop computer as it's mostly used as an embedded device in robotics, sensor reading or computer vision projects. For a more powerful desktop machine, there is the current latest version, the Pi 4, which actually makes for a pretty usable machine, but at a higher cost.  

I suppose to some degree, the goals of the Pi Foundation aligns partially with the OLPC initiative in that their goal is around education. It seems to be a perfect fit - if the hardware could be pushed beyond what it was designed for. 

So, how could a simple £10 board be converted into a PC? For starters, the board comes bare, in that there are no peripherals.

For that, we're going to have to add a few parts:

1) Keyboard

2) Mouse

3) Monitor

4) SD Card

5) Case

6) Power Supply

7) Mini HDMI to HDMJI adapter

8) Micro USB to USB adapter

9) Depending on whether HDMI sound is used or not, a USB hub and sound card

The most expensive part of the build will probably be the monitor, but if a cheap monitor is used, it may still come in at around $100.

With the hardware defined, the next part is the software. This is arguably the most important part. We're going to be running a Linux distribution on the computer. The Raspberry Pi Foundation has done some excellent work on packaging a Linux based operating system for the the Raspberry Pi. However, I suspect that the desktop version of their OS is more aimed at the much more powerfull Raspberry Pi 4 and not the Zero. Thus, whilst it technically works on the Pi Zero, to me, it's too slow. The Pi Zero has very limited specs, the highlights being:

  • 1GHz ARM CPU - BCM 2835 SOC
  • 512MB RAM
  • Wifi and Bluetooth
To make the most of these specs, we'll have to construct an incredibly light and efficient operating system. We'll start with the official Raspberry Pi OS light version, then add a graphical interface on top of that and then just the essential software to complete the system and make it visually appealing. There is always a balance between being lightweight and ease-of-use, with tradeoffs either way. With the software I've chosen, I think that this is a reasonable setup whilst maintaining a very low memory footprint. There will always be subjective debates as to which software component is better and this being an evolving setup, will probably change over time as I discover better options.  

Software Instalation

The following steps were followed to create the above setup:

  1. Insert the SD card into an card reader and insert into a PC.
  2. Download Raspberry Pi OS Lite from https://www.raspberrypi.org/software/operating-systems/#raspberry-pi-os-32-bit
  3. Write the Image file to the SD card - Depending on the whether Mac, Windows or Linux is used, there are slightly different steps involved, but there are many guides online as to how to do this. 
  4. Insert the card into the Raspberry Pi, plug in the accessories and boot the device. At this point, the device should boot into the command line interface, requesting a login.
  5. Login with the account "Pi" and the password "raspberry"
  6. Type in sudo raspi-config
  7. Setup the wifi connection.
  8. Enable SSH for remote management using the command prompt
  9. Enable realvnc for remote management using a remote desktop connection
  10. Change the default password
  11. Exit the config tool and execute the following commands:
    1.     sudo apt update
    2.     sudo apt upgrade
    3.     sudo apt install icewm
    4.     sudo apt install --no-install-recommends xserver-xorg
    5.     sudo apt install lightdm
    6.     sudo reboot
  12. At this point, it should boot into the desktop user interface. Click on the start menu and click on Terminal 
  13. Type in the following commands into the terminal
    1.     sudo apt install xarchiver
    2.     sudo apt install leafpad
    3.     sudo apt install pcmanfm
    4.     sudo apt install dillo
    5.     wget https://www.realvnc.com/download/file/viewer.files/VNC-Viewer-6.20.529-Linux-ARM.deb
    6.     sudo dpkg -i VNC-Viewer-6.20.529-Linux-ARM.deb
    7.     sudo apt install midori
    8.     sudo apt install gimp
    9.     sudo apt install nitrogen
    10.     sudo apt install lxappearance
    11.     sudo apt install vlc
    12.     sudo apt install omxplayer
    13.     sudo apt install ffmpeg
    14.     cd ~ && wget https://github.com/KenT2/tboplayer/tarball/master -O - | tar xz && cd KenT2-tboplayer-* && chmod +x setup.sh && ./setup.sh
    15.     sudo apt install python-tk
    16.     sudo apt install abiword
    17.     sudo apt install viewnior
    18.     sudo apt install gcalculator
    19.     sudo apt install scrot
    20.     sudo apt install synaptic
    21.     sudo apt install pi-package
    22.     sudo apt install wicd
  14. Download and install the ariata light theme from https://www.box-look.org/p/1321163/ 
  15. Download and install the Papirus Icon light theme: wget https://git.io/papirus-icon-theme-install | sh
  16. Download your prefered background and set with Nitrogen
  17. Set the Icon theme to Papirus
  18. Set the IceWM theme to ariata light
Software description and uses:
 
icewm - The desktop environment
lightdm - Login manager
xarchiver - Compression software
leafpad - Text Editor
pcmanfm - File Explorer
dillo - Web Browser
VNC-Viewer - Remote Desktop Client
midori - Modern Browser
gimp - Image Editor
nitrogen - Desktop Background setting
lxappearance - Desktop settings
vlc - Media Player
omxplayer, ffmpeg, tboplayer, python-tk - Youtube Downloader and player
abiword - Word Processor
viewnior - Image viewer
gnome-calculator - Calculator
scrot - Screenshot software
pi-package                                                 - The Raspberry Pi Package Manager
synaptic                                                     - A Software Package Manager
wicd                                                           - A Network Manager

other potential software:
Sylpheed - Email
Remmina - RDP
xrdp - RDP
rofi - Application launcher or window switcher
cups - printing

To complete the setup, personal key bindings for applications are to be setup such as Scrot, and menu options are to to customised. The login manager can also be styled to integrate with the rest of the look of the OS.

Future enhancements
There are numerous software packages which could be tested, to minimise memory usage and maximise speed. Visually, I think that Rofi could be very nicely integrated into this setup and could be very useful. As mentioned, keybindings should be setup to make use of the installed software such as scrot for screencapture etc. The menu items should be optimised and a menu editor should be installed for ease of customisation. Assuming that it won't be possible to stream videos from YouTube, an easier method of browsing YouTube, downloading and playing videos should be created. A possible fork of tboplayer may need to be created, focused on YouTube browsing. 

Final Thoughts
This setup starts up using about 100MB RAM which is very impressive. This may even be lighter than other super lightweight Linux versions when setup similarly such as Puppy Linux, Diet Pi or TinyCore. Considering that this is running on a Pi Zero, it's reasonably responsive. It is fairly usable for editing documents, light photo editing, emails, listening to music or watching some downloaded video. Remotely connecting to another machine via RealVNC works fairly well, but don't expect to watch youtube videos through the remote session as there is a bit of lag on the response. 

The major weakness of this setup though is the browsing performance. Whilst Dillo is very fast, and is just about usable to browse some sites such as Wikipedia, it does not support JavaScript. This means that many sites do not work properly or load at all. Midori is a reasonable browser, but is very slow on the Pi. It could however be a fallback when a modern browser is absolutly necessary. A possible alternative to Midori could be NetSurf, but this hasn't been tested as yet. Apparently supporting JavaScript and using a lightweight rendering engine, it might provide a more complete browser than Dillo. To watch YouTube videos, currently tboplayer is used to search and download the videos, but this is not ideal. The playback performance using omxplayer is very good, but the searching and browsing is very cumbersome. An alternative to downloading the entire video before playback may be to is to use VLC to stream and transcode the video, but this hasn't been tested as yet.

Overall though, it is still very impressive what can be achieved with a lightweight system like this and even if this isn't setup on a Pi Zero, it may be useful on more powerful hardware to maximise resources available. As an exercise in restraint, it shows just how much can be achieved when limiting the installed software to only what's required.


Part seven of the series detailing the OWASP top 10 web application vulnerabilities with a focus on password hashing. (See intro)

"Insecure cryptographic storage" relates to a number of aspects, but I think that it can be broken down to two main areas: Encryption and Hashing.

As these are similar in some respects and are often both used together, there's a bit of confusion around what they are.

Firstly, encryption uses a mathematical formula to transform human readable data into an unreadable form by means of a key. Often encryption is a symmetric process. That is, the same (or trivial) key is used to lock (encrypt) the data as to unlock the data. This differs from asymmetric (or public-key) encryption where there are two different keys employed - One for locking and the other for unlocking. One constant in encryption is that there is a key which must be kept safe. This key is employed by means of a sequence of data and may be stored in a file on the server if needed continuously by a computer program. This obviously implies that anyone who can break into the server and get access to the key can unlock all the data.

Hashing is similar to encryption in that it transforms data from a human readable form into an unreadable form via a mathematical function. The primary difference between the two is that hashing is only a one way function. In other words, given the hash (or resultant) code, nobody should be able to work out the original data. An example of a hash value for the entered phrase "test" using the Md5 hash algorithm is: 098f6bcd4621d373cade4e832627b4f6

If you can't ever retrieve the original data what use is this? One of the common uses is for securing passwords. The way in which it works can be explained by means of an account registration and login example. Upon account creation, the password is hashed, thus giving a block of unreadable data. This is then stored in the database as the "password". When the user enters their password during the login process, the entered password is once again hashed and then the two hashed values are compared. If they are the same, the user entered a valid password. Note how the password in human readable form is never needed to determine if the user has entered the correct password. So, even if a hacker got access to the system's source code and the hashed passwords, due to the fact that a hashed password can't be reversed, it is theoretically impossible to crack someone's password. Not quite...

There are a number of techniques employed in cracking passwords. Firstly dictionary attacks take a dictionary of words and try each one sequentially until a match is found. They would also try combinations of words, or words with prefixed and/or appended numbers. As it is much simpler to remember a name or word, people invariably choose simple passwords and therefore the dictionary attack is amazingly effective. This highlights the importance of having a minimum strength password policy in place, forcing a user to select a password with a combination of uppercase letters, punctuation and both alpha and numeric values therein.      

The other widely used approach is the use of rainbow tables. Basically, a hacker has a stored table of data which in essence contains two things; passwords and the hashed value for each password. Additionally, these hashed values are indexed in the database which makes it very quick to simply look up a given hash value and determine the corresponding password. This approach uses the time/memory trade-off as these tables are very large but allow much quicker cracking of hash values.

As an example of how easy this can be, using the hash example above, the hash value 098f6bcd4621d373cade4e832627b4f6 can be "broken" in seconds using online web based tool at:  http://www.md5rainbow.com/

The way to defeat the rainbow tables is to add a salt to the hash value. A salt is a random set of data that is appended to the given password which makes the cracking of the password unlikely by means of lookup tables. 

As an example, a 3 letter password containing only letters could have 17576 different possibilities(26x26x26). If another 3 letters were added before hashing, such that the final string = salt + password, there would be 308915776 permutations. The resultant space that would be required to calculate all the possibilities for all salts becomes exponentially greater as a longer salt is used. This renders generating a pre-compiled table infeasible.

Once the concatenated string has been hashed, both the salt and the hash are stored in the data store. The salt will be used later again to validate that an entered password is correct by using the same salt, hashing the resultant string and comparing it to the stored value. The storage of the salt with the password may sound counter intuitive, but it's sole purpose is to eliminate the possibility of using a pre-compiled table to crack passwords.

One more point about a salt, is that every salt must be unique. If all your records are hashed with the same salt then a determined hacker would only need to regenerate a single rainbow table for the given salt and then lookup any password. If every salt is unique, then the hacker would have to regenerate the table for every hashed password, making it much more difficult.  

Finally, there are a number of different hashing algorithms and some are better suited to particular jobs than others.

Some of the more common ones include: SHA256, MD5  and WHIRLPOOL. The SHA family of hash algorithms are probably one of the better general purpose algorithms to use, but check that any hash algorithm that you choose to use is secure.

There seems to be an amusing correlation between the history of the fight between Kevin Mitnick and Tsutomu Shimomura as portrayed in the movie Takedown and the goings on with Anonymous and HBGary. In the same way as the "expert", Shimomura, was hacked by Mitnick, HBGarry was hacked a while ago after annoying the group. By means of getting in through the company website via an SQL injection attack, breaking unsalted hashed passwords via rainbow lookup tables and some social engineering, they managed to download the company emails and splashed them all over the Internet.

What is yet to play out, is will Anonymous members be caught in the same way as Mitnick was by Shimomura.

Here is an interview with Mitnick which has a few comments about the related Lulzsec group. Amusingly, Mitnick is asked whether he can track them down if he were paid $1 million. I think that he side stepped that question carefully by not insulting the group and making himself a target, as HBGary did. 

(starts around 4 minutes)

Here's an excellent series of articles on an "average" Windows user, trying out Ubuntu Linux for the first time. I think his experience closely mirror many others, including mine. This was just one person's experience but I think his final conclusions may give interested people some perspective on the OS.

http://www.pcworld.com/businesscenter/article/229187/30_days_with_ubuntu_linux_day_1.html


Twitter Delicious Facebook Digg Stumbleupon Favorites More